There is something about printer administration
Friday, January 12, 2007
Lately I had to spend several days trying to make an old matrix printer to print a SAPscript form on the continuous paper. Usually the Basis guys are the ones taking care of the printer setup, but where I work it’s like this: you get an assignment to work on a form - you have to deal with the printer setup. Or with the Basis guys. I personally prefer to deal with the printer directly. :)
It is kind of outside of the ABAP scope but, having spent so much time on it, I might as well share the experience (and knowledge) with you. So let’s walk through the whole process, starting with adding a custom paper size and ending with the printer configuration to print on that paper.

Printer administration happens in the transaction SPAD. To add a new paper format you need to have access to the extended administration. SPAD might be confusing at times because instead of giving a “no authorization” message it just hides stuff from you. So if you don’t see any of the buttons or menu options mentioned here, it’s most likely a security issue. Check with your security administrator if you can get full access in the test system or, well, just watch.
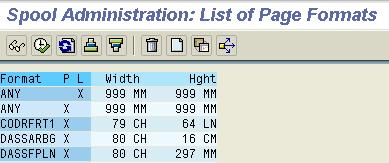 First step would be to create a new Page Format. In SPAD, go to [Extended Admin.], Device Types tab and click on the [Page Formats] button. (You can also get almost anywhere in SPAD by drilling down, i.e. double-clicking, from the printer list but I’ll be giving the direct access path here for demonstration purposes.) After that you should see a list of the page formats available in the system. To create a new format or copy an existing one you’ll need to click the Change button (a pen) first, then your list will look like on the screenshot here. To copy an existing format, single-click on it and click the button 'Create using template' (F5). (For some reason this button is used in SPAD where really a 'Copy As...' button should be. Probably it’s just to keep the Basis guys alert.) The Page Format only holds the paper size and orientation (Portrait or Landscape). This format is then used in SAPscript or Smartform only to let SAP know how much space to allow on the form. As I’ve learned, for the matrix printer this size doesn’t mean a diddly squad.
 After the new page format has been saved (name should start with Z, as usual, most likely you’ll be prompted for a transport number), the next step is to define the Format Type. Technology is very much the same – click on [Format Type] button, then on the 'pen' button to create or copy an existing one. At first this Format Type thing seems kind of redundant, but its purpose will become clear later. So, for the Format Type basically just pick a Page Format, orientation (again, for some reason) and add some meaningful description. If defining the format for SAPscript or Smartform, pick ‘Format type for SAPscript’ in the Type field. Save your creation.
The next step is to either create a new Device Type or to assign your Format Type (not to be confused with the Page Format!) to an existing device type. Just for demonstration I'm going to create a new device type and a new printer in SAP, but let me take a moment to explain this concept. The actual printer, that sits somewhere in the office, is called the output device and can be maintained on the Devices/Servers tab ([Output devices] button, naturally). Each printer, AKA output device, must be assigned some device type. For me it’s easier to think of the device type as of the printer’s model. Let’s say you have two identical laser printers sitting in two different offices. Since they are the same model and use the same driver, you would need to create one device type (or use an existing one, there are quite a few provided in SAP) and two output devices with this device type.
 So, back to SPAD. Still in the Extended Admin area (Device Types tab), click on the [Device Types] button. There are many standard device types available, so usually you would only need to copy an existing type at most. If none of them fits, better leave it to the Basis guys to set up the printer. For my task I had to copy a standard ASCIIPRI device type (generic ASCII printer). On the Attributes tab you can select the printer driver and the character set (in case you need to print in different languages). Print Controls tab (as seen on the screenshot) is a bit more interesting. Print Controls allow sending some special codes to the printer to, well, control how to print stuff. Each print control (they have 5-character names. e.g. SC120) deals with one printing feature. For example, SPAGE contains a special code for the page break, SLINE – for the line break. If these codes are deleted (I tried!) the printer starts printing everything on one big line. SPAGE and SLINE controls came with the standard ASCIIPRI device type, but I had to add some code for SC120, otherwise the printer did not print the 12 pt font correctly. I honestly don’t know what does this code mean, I just copied it from the Epson printer settings and it somehow worked. If you are curious the description of all print controls can be found here.
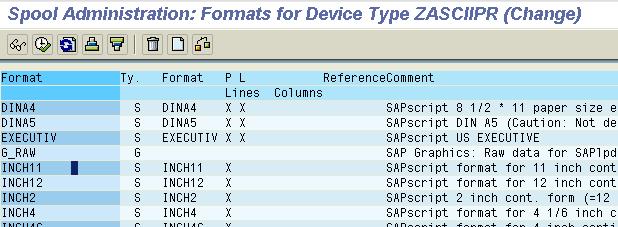 OK, now is the time to finally link this new device type with all the page formatting that we did on the first two steps. To do so, on the same screen click the [Formats] button (the one with the blue thingy) or F6. This will bring up a list of the format types that are assigned to this device type. If you copied an existing device type you should see a bunch of standard formats there, like DINA4 or LETTER. Now this is again counter-intuitive but there is no button like ‘assign format type’, you need to use the ‘Create’ (blank page) button instead. When you click ‘Create’ button it opens a small window with the only field Format in it. Type in or select your format type (ZINCH8.5_INVOICE in this example) and hit [Enter]. This will open the screen ‘Maintain format ... for device type ...’. Most likely you won’t need to touch the Attributes tab, but the Formats tab (note how they use the word “format” in like third different context here) is quite interesting. Here you can enter the whole mini-program to send to the printer for different actions, e.g. ‘initialization’ or ‘end of page’. If an action has a green light next to it, it means that there is something programmed (although it might be just a comment line).
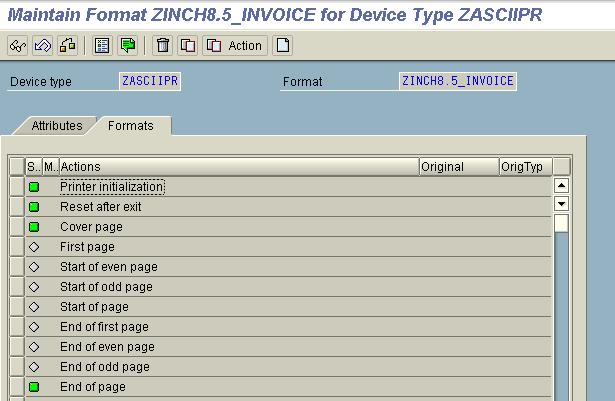 Programming here happens not in ABAP (unfortunately) but in a language that printer can understand. SAP suggests that you look into your printer documentation for more information. (Yeah, good luck with that!) Normally you wouldn’t need to do any programming here and/or should be able to use whatever comes with the standard formats. Just keep in mind that when you copy a standard format type, those mini-programs are not being copied automatically. To copy them, click the ‘Copy format’ button (F5). You can also just copy/paste the code into actions manually. In my case the standard device type ASCIIPRI came with no “program”, so I copied the following piece of code from the Epson printer:
# reset
\e\0x40
# select US-ASCII character set
# \e\0x52\0x00
# set line spacing 6 LPI
\e\0x32
# set page length (33)
\e\0x43\0x33
# cancel bottom margin
\e\0x4F
# set left margin to 0
\e\0x6C\0x00
Not sure if all of this was necessary but it worked, so I’m not touching it. The most important thing that I had to change was the page length: \e\0x43\0x33 line. This probably doesn’t matter for the laser printers which print on the single sheets of paper, but it turns out that this is the only place where the actual page length is set for the continuous paper (see OSS note 79288). Number 33 is hexadecimal for page length, which is equal to 51 lines (8.5 inch by 6 lines per inch) in decimal system.
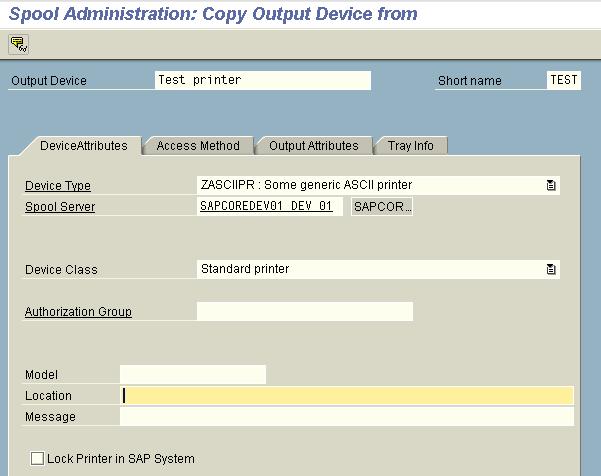 Save your new device type with all the bells and whistles. The last step is to create a printer, AKA output device, which is done, as mentioned above, on the Devices/Servers tab. As usual, you can create a brand new device or copy an existing one. This step is actually pretty simple: just pick your new device type from the list, assign a spool server, and enter the printer’s IP address on the ‘Access method’ tab. For the ‘Host Spool Access Method’ I’ve chosen ‘U’ for my test, but you might need to pick another option. It’s always a good idea to check the configuration on an existing printer that works and just copy as much as you can from there. On the Tray tab you can select which page formats are going to be used on each tray, but for the dot matrix printers I suggest to leave this tab blank.
 OK, I think now we can do the Basis support as well! Just kidding... More information on the subject of printing can be found in the SAP Library, it’s pretty boring though and explained mostly in the SAP’s favorite stiff manner.
In conclusion let’s just quickly summarize the basic concepts that we’ve learned today:
- page format holds the paper size and tells the SAPscript and Smartform how much space to allow;
- format type provides a longer description of the page format and links it to the device type
- device type is very much like a printer model, you can send the commands to the printer from here and you can tell which paper size can be used by linking it to the format type
- output device is a specific printer, which is linked to the device type; this is where you enter the printer’s IP address.
Happy printing, everyone!
posted by Your Friendly ABAPer @ 14:07,
![]()
![]() Direct link to this post
Direct link to this post
4 Comments:
-
At 16/1/07 16:03,
 said...
-
Jelena,
I remember I had done lots of device type, output device, page format settings in the implementation projects, especially for line printers like you've done. You are right to handle these settings. It seems Basis work, but Basis people sometimes don't understand those kinds of settings in detail.
Very useful article! Nice job :). -
At 23/1/07 21:42,
said...
-
Tuncay,
Thanks for the comment and congrats on your new job! I'm looking forward to reading more about your experiences. -
At 2/4/15 06:46,
 Unknown said...
-
This comment has been removed by a blog administrator.
-
At 15/6/16 05:25,
Mike D said...
-
A very useful post. I know the BASIS guys in two companies I joined do not do this sort of task, rather the SAP Printing Admins, who specialize in these topics. Once the device types, format types, and page formats were added or created or modified, the transport file is prepared and BASIS guys normally just do the transport to different SAP systems. I suppose it's a new role, SAP Printing.
